- Firebase是今年Google在開發者大會發表的App分析工具,也把推播整合了進去,以下示範實作推播,程式碼部分直接用Github上的範例專案
- https://github.com/firebase/quickstart-ios
- 說穿了就是在Apple的APNS中間夾了一層Google做的interface,讓開發者不用弄一些伺服器那邊的麻煩手續
- 圖片多,請注意網路流量。
1.建立新專案
將專案的Bundle ID記下來
 |
| 新增說明文字 |
2.使用terminal的cocopods初始化專案,不會使用cocopods的,在此不教學喔!
cd FirebasePusher/
pod init
在專案根目錄打開PodFile,填入
pod 'Firebase'
pod 'Firebase/Messaging'
使用terminal安裝Firebase
pod install
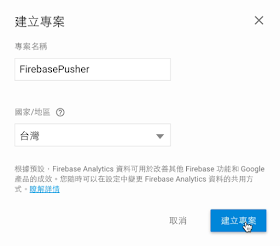
3.在Firebase網站,建立新專案
選擇中間,加入iOS SDK
8.將下載下來的plist丟進Xcode
記得選Copy items if needed
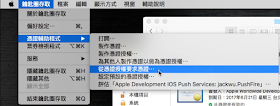
4.接下來製作"推播憑證授權要求",打開鑰匙圈存取
填入你的Email與名字,記得選"儲存到磁碟"
將憑證儲存到桌面
5.在Apple Developer新增App ID
填入App 名稱
填入剛剛記下來的Bundle ID
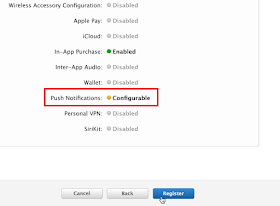
記得勾選Push Notifications,按下Continue
注意Push Notifications現在是Configurable的狀態,按下Register
6.在Certificates的Development新增憑證
選擇剛剛加入的App ID
上傳剛剛從鑰匙圈製作的"推播憑證授權要求"
下載憑證,並點兩下安裝
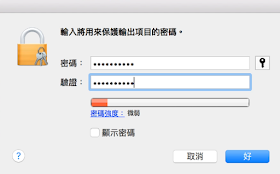
在鑰匙圈裡可以看到安裝的憑證,匯出專用密鑰
匯出時會要求設定密碼,填入定義的密碼
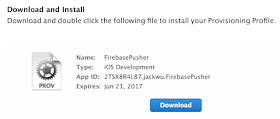
7.到Apple Developer的Provisioning Profiles新增開發憑證
點選右上角新增憑證
選擇iOS App Development
選擇剛剛新增的App ID
選擇開發人員憑證
選擇開發裝置
為此開發憑證命名
下載此憑證並點兩下安裝
8.到Firebase網站的專案底下,匯入憑證
上傳剛剛匯出的密鑰,記得打上剛剛定義的密碼
9.到Xcode中寫程式囉,可以參考一下網址的程式碼,直接複製貼上
或者照我做
在AppDelegate.m最上方引入Firebase
@import Firebase;
@import FirebaseMessaging;
- 在didFinishLaunchingWithOptions的函式填入
// Register for remote notifications
if (floor(NSFoundationVersionNumber) <= NSFoundationVersionNumber_iOS_7_1) {
// iOS 7.1 or earlier
UIRemoteNotificationType allNotificationTypes =
(UIRemoteNotificationTypeSound | UIRemoteNotificationTypeAlert | UIRemoteNotificationTypeBadge);
[application registerForRemoteNotificationTypes:allNotificationTypes];
} else {
// iOS 8 or later
// [END_EXCLUDE]
UIUserNotificationType allNotificationTypes =
(UIUserNotificationTypeSound | UIUserNotificationTypeAlert | UIUserNotificationTypeBadge);
UIUserNotificationSettings *settings =
[UIUserNotificationSettings settingsForTypes:allNotificationTypes categories:nil];
[[UIApplication sharedApplication] registerUserNotificationSettings:settings];
[[UIApplication sharedApplication] registerForRemoteNotifications];
}
// [START configure_firebase]
[FIRApp configure];
// [END configure_firebase]
// Add observer for InstanceID token refresh callback.
[[NSNotificationCenter defaultCenter] addObserver:self selector:@selector(tokenRefreshNotification:)
name:kFIRInstanceIDTokenRefreshNotification object:nil];
//2016/06/23 以下不用做
在空白處新增一個函式
在 applicationDidBecomeActive填入













沒有留言:
張貼留言